Diamond of The Season Blanket
- Jan 7, 2025
- 6 min read
Updated: Jul 29, 2025
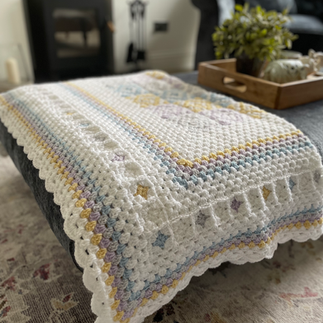
If you've ever watched the Bridgerton TV series, you will be familiar with the beautiful pastel hues of the Regency era costumes. These inspired the pretty colours used in my blanket. And what better pattern to use at the centre, than a diamond granny square!

Lots of people have asked for this blanket pattern, but I've not had the time yet to write up a detailed pattern in it's entirety. So for now I've written this blog post containing my 'recipe' which you can follow. This is NOT the full detailed pattern but you can easily use this as a guide to make your own.
If you are unfamiliar with some of the crochet skills needed to make this blanket, you can find lots of amazing makers out there on YouTube with brilliant crochet skill tutorials.
A note on copyright. The written instructions and photos within this blog post for the Diamond of The Season Blanket belong to me (Harriet's Duck - Kate Gohil). Please do not copy, re-publish or sell them as your own instructions/pattern. You can of course sell any items you make using these instructions. I would appreciate you tagging me as the designer of this blanket on social media.
If you make this blanket I hope you enjoy it! Tag me @harrietsduck on Instagram and show me your amazing makes!

Skill level
To make this blanket you’ll need to know or learn:
How to crochet basic crochet stitches
How to crochet a granny square
How to crochet a diamond granny square
How to join squares using the slip stitch method
How to join with CJAYG ‘Continuous Join As You Go’ (this is different to Join As You Go)
How to crochet a shell border on a granny square (my favourite tutorial for this is linked in the recipe)
Yarn
Stylecraft Special DK 100g skein: 1 x Buttermilk
Paintbox Yarns Simply DK 100g skein: 1 x Dusty Rose, 1 x Duck Egg Blue, 1 x Misty Grey, 6 x Paper White
Hooks
4mm
5mm used to join the Diamond Granny Squares using the Slip Stitch Method
Method
Make 25 x Diamond Granny Squares
We use a granny square here and change colours at different points to create a diamond pattern. You will need to search YouTube for a tutorial if you are new to this. It can be a little fiddly as you need to carry the yarn, but keep practicing! There will be a right side and a wrong side to your squares.


Make 25 diamond granny squares in the following colours:
7 x Misty Grey and White
6 x Duck Egg Blue and White
6 x Dusty Rose and White
6 x Buttermilk and White
Note: Each of my squares consists of 5 rounds.
Once made, you may like to block the squares before you join.
Join the Diamond Granny Squares
We use the 'Slip Stitch in back loop only' method here. Search YouTube for a tutorial if you are new to this.


Join the squares as follows:
Lay the squares in a 5 x 5 format – you can use my pictures if you’d like to make the same colour placement. I suggest joining all the rows first then join the columns.
Using a 5mm hook, placing the squares to be joined front side (right side) together, use the slip stitch joining method through the back loops only, keeping them carefully aligned.
This method creates a close join on the front (top two photos) to give us the joined-up diamond effect. It creates a slight ridge on the back (wrong) side of the blanket (bottom two photos). Don't slip stitch too tightly. I used a 5mm hook to join as a 4mm hook made the join too tight and the squares puckered. Do what works for you.
Frame the Diamond Granny Squares - 15 Rounds
Once you’ve joined all the squares simply join your White yarn in any corner and continue as you would for a granny square, with the following rounds in granny square cluster stitches:

7 x White
1 x Buttermilk
1 x Dusty Rose
1 x Misty Grey
1 x Duck Egg Blue
4 x White
Note: when working rounds of granny clusters, I turn my work over after each round to keep my blanket square.
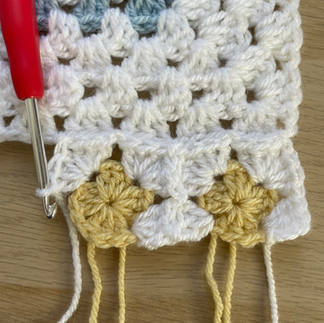
Make 84 x Mini ‘Diamonds’
My mini diamonds are simply the first round of a granny square. Make 84 x as follows:
42 x White
11 x Buttermilk
11 x Dusty Rose
10 x Misty Grey
10 x Duck Egg Blue

NOTE: in order to join the mini diamonds using the CJAYG method way, you need to have an EVEN number of granny clusters on each side of your blanket. If you are following my recipe, you’ll have 40 granny clusters on each side before you join your mini diamonds.
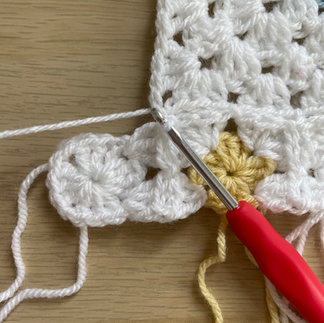
Join the Mini Diamonds
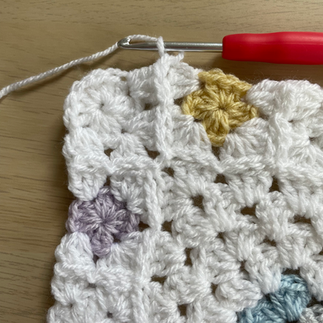
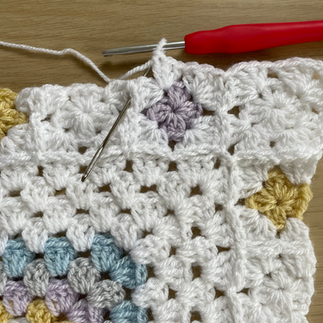
We use the Continuous Join As You Go Method here. Search YouTube for a tutorial if you are new to this. If you've not done this before it can seem very fiddly. Watch lots of tutorials of the usual way to use CJAYG before attempting this part if you are new to it. I love this method and it's definitely worth learning. In this pattern we are using the CJAYG method to attach one round of mini diamonds to the 4 sides of the blanket, in a square shape. I've tried to add a bit more photo guidance for this part for you to use in conjunction with your own CJAYG knowledge/tutorial and hope it helps.
Start in any corner of your blanket on the right side (front side) and work your way all the way around using white yarn to join the mini diamonds in the following colour order:
White – Buttermilk – White – Dusty Rose – White – Misty Grey – White – Duck Egg Blue
Start in one corner directly above the first two clusters of the row in line with the blanket edge, and use the CJAYG method. The below photos show the progression of joining the first two mini diamonds (Ignore the 2nd colour I've used as its just an example!). In some photos I've used a needle to show where the slip stitch needs to go if you are unsure:


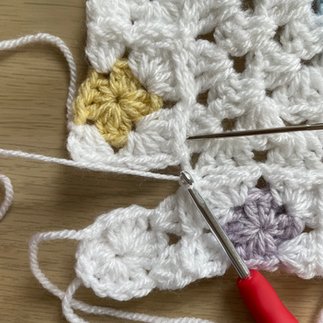
When you reach the first corner you will add the last mini diamond of the first side beyond the corner so it sticks out, then turn the corner and you are able to continue joining along the second side. I've shown this progression below:


Repeat for the next two corners. Once you get round to the last corner at the start of the mini diamonds, join as shown below:


Next work you way back along the way you came (as per CJAYG method) to complete the bottom of the entire round of mini diamonds. I've tried to show the start of this below:


Frame the Mini Diamonds - 10 Rounds
Once all mini diamonds are joined and you’ve worked back around to complete the squares fully, you can simply continue crocheting rounds of granny cluster stitches all the way around again as follows (turn over after each round to keep your blanket square):

4 x White
1 x Duck Egg Blue
1 x Misty Grey
1 x Dusty Rose
1 x Buttermilk
2 x White
Finish with Shell Stitch Border - 1 Round
Finish by crocheting a super simple shell stitch border. You'll find my favourite YouTube tutorial for a shell border for granny squares here by the lovely Hooked By Robin.
Keep the right side (front side) of the blanket facing you to crochet the border. Note: for this border to work you need to have an even number of clusters on each side of your blanket square. If you are making the exact same size as me you should now have 54 granny clusters along each side (if you changed the pattern and have an odd number of clusters simply add or remove a round).
Enjoy!
Weave in all your ends if you haven’t already, and snuggle with the prettiest blanket!
Hopefully this has inspired you to make your own Diamond of The Season Blanket! I’d love to know what you think and see your makes, tag me on Instagram @harrietsduck and use the hashtag #diamondoftheseasonblanket
Kate x