FREE Crochet Pattern - Sweet Magnolia Baby Blanket
- Jul 29, 2025
- 6 min read
Updated: Jul 30, 2025
This adorable baby blanket is the perfect gift for a new baby, and it's a quick and simple, beginner friendly granny stripe pattern to work up.

I don't often take commissions, but a friend recently asked if I would make three baby blankets for her to gift and I couldn't resist. When it came to the last blanket, for a baby girl, I deliberated for ages and swatched up a few different patterns, none of which I liked! In the end I reverted to type and decided to make a beautifully simple granny stripe blanket, and I'm so pleased I did!
A granny stripe pattern is beginner friendly, it's easy to change up the size, and you can customise it lots of ways using different types of yarn, colours and borders.
I chose Stylecraft yarn from my stash, some of which I used in my Summer Shades Granny Square Blanket, and picked up a shade I'd not tried before (Wild Orchid - so pretty!) in my local yarn store.

I decided to call this pattern the 'Sweet Magnolia Baby Blanket', as I binge watched the TV show Sweet Magnolias whilst making it and the colours remind me of magnolias.
The pattern below is for a baby blanket size approx 78x100cm. This is based on my own tension and after I have washed and blocked the blanket. You can adjust the size if you prefer by adjusting the starting chain and number of rows, but this will of course affect the quantity of yarn needed.
It's always a good idea to crochet a small practice swatch of the first few rows of the pattern before you start a project. You often have to do this to obtain the right gauge, but even if you don't need to worry about gauge (like in this project) you might like to make sure you understand the pattern before starting a big chain! The chain multiple for this pattern is 3, plus 2. So for your small swatch you could chain 24 plus 2.
Please note! The pattern below is written in UK Crochet Terms (I'm in the UK), but with only a few stitches used it is easy to convert to US Terms (see Abbreviations listed below in the pattern).
This is a beginner friendly pattern, but you will need to know:
Basic crochet stitches
How to change colour
How to read a crochet pattern - although this is a good pattern for learning this skill!
Sweet Magnolia Baby Blanket Pattern
(UK Crochet Terms)
Materials
Stylecraft Special DK - 100% acrylic (100g/295m/322 yards per ball)
3 x Cream
1 x Wild Orchid
1 x Pale Rose
1 x Parma Violet
1 x Parchment
4mm Crochet Hook
Tapestry Needle for weaving ends
Scissors
Abbreviations
ch - chain
st - stitch
sts - stitches
sp - space
dc - double crochet (US Terms single crochet)
tr - treble crochet (US Terms double crochet)
htr - half treble crochet (US Terms half double crochet)
tch - turning chain
sl st - slip stitch
RS - right side of the project
WS - wrong side of the project
Notes
Pattern is written in UK Crochet Terms.
Gauge is not critical for this project provided you keep your tension consistent.
The chain multiple for a granny stripe pattern is 3, plus 2.
Ch3 at the start of a row counts as a treble crochet stitch.
Use your favourite method to change colour. To use my method - when making the final stitch of the row change to the new colour on the last yarn over, drawing it
through the last 2 loops to complete the stitch. The new colour is then ready to make the turning chain.
Finished size (after washing and blocking) 78x100cm
There will be lots of ends to weave in so I suggest you do this after every 10 rows or so.
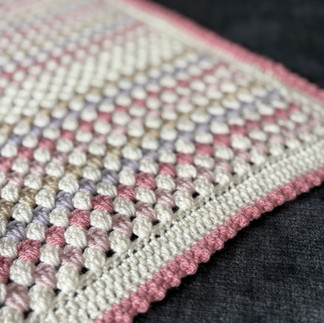
Colour Sequence
Each colour repeat consists of:
Cream / Wild Orchid / Cream / Pale Rose / Cream / Parma Violet / Cream / Parchment
Use the photo and the below sequence to help you change colours:
Row 1 - Cream
Rows 2-17 - 2 x colour repeat
Rows 18-21 - Cream
Rows 22-69 - 6 x colour repeat
Rows 70-73 - Cream
Rows 74-89 - 2 x colour repeat
Row 90 - Cream
Row 91 - Cream
(Remember to start each colour sequence with Cream after the 4 rows of Cream in rows 18-21 and 70-73, so you will have a total 5 rows of Cream in these blocks before you change to Wild Orchid )


Blanket
Using Cream, chain 131 (this is 129 plus 2).
Row 1 (RS): dc in second ch from the hook (mark this first dc stitch with a stitch marker - we are not counting the turning chain as a stitch here), dc in each chain across, turn. [130 sts]
Row 2 (WS): ch3 (counts as a tr here and throughout), 1tr in same st, * skip 2 sts, 3tr in next st; repeat from * across until 3 sts remain, skip 2 sts, 2tr in last st (marked with a stitch marker), turn.
[You should have 2tr in the first st, 42 clusters of 3tr, 2tr in last st]


Change to Wild Orchid
Row 3 (RS): ch3, work 3tr in sp between the 2tr and first 3tr cluster, * 3tr in next sp; repeat from * across to last sp, 3tr in last sp, 1tr in top of tch from previous row, turn.
[You should have 1tr in the first st, 43 clusters of 3tr, 1tr in last st]


Change to Cream
Row 4 (WS): ch3, 1tr in same st, * 3tr in sp between clusters; repeat from * across to last sp, 3tr in last sp, 2tr in last stitch (top of the tch), turn.
[You should have 2tr in the first st, 42 clusters of 3tr, 2tr in last st]


Rows 5 - 90 - Repeat rows 3 and 4, changing colour as per the sequence in the Notes. You should end with a repeat of row 4 in Cream worked on the WS of the project. Turn.
[You should have 2tr in the first st, 42 clusters of 3tr, 2tr in last st]
Row 91 (RS) - ch1 (does not count as a st), dc in each st across. [130 sts]
Do not turn.
Do not fasten off.
Border
We will now work the border, continuing in Cream. I try not to crochet tightly when working on the border, especially the first round. Feel free to change hook sizes if you find any of the border rounds too tight/loose. Everyone is different!

Round 1 (RS)
Ch1 (does not count as a st), 3htr in same st for the first corner.
Along the first long side of the blanket work 1htr for rows of dc and 2htr for rows of tr clusters until you get to the next corner.
Continue along the bottom of the blanket, working into the starting chain - work 3htr in the first ch to make the 2nd corner, then 1htr in each ch across to last ch, work 3htr in last ch to make the 3rd corner
Continue along the second long side of the blanket, working 1htr for the rows of dc, and 2htr for rows of tr, to the next corner.
Continue along the top of the blanket, work 3htr in the first st to make the 4th corner, and 1 htr in each st across, sl st to top of first htr to join.
Do not turn. Do not fasten off.
Round 2 (RS): ch2 (does not count as a st), 1tr in each st around, in the corners work 3tr, sl st to top of first tr to join. Do not turn. Fasten off.
Join Pale Rose in any corner st.
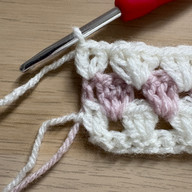
Round 3 (RS): ch1 (does not count as a st), 3htr in same corner st, htr in each st around, working 3 htr in the corners, sl st to first htr to join, turn.
We will now work the 'mini bobbles' on the wrong side of the project, so they pop out on the right side. The mini bobbles are made using a treble stitch followed by a slip stitch. You need to crochet the slip stitches fairly tightly. (Don't worry if you get to a corner and you have run out of stitches to work a sl st after the tr, the dc in the corner will fix it into place and it will still look great. I hope that makes sense!)......
Round 4 (WS): ch2 (does not count as a st), 1tr in the first stitch after the corner st , sl st in the next st, * tr in next st, sl in next st; repeat from * around, working 3dc in each corner, sl st to first tr to join. Fasten off.
Weave in any remaining ends. I washed my blanket and blocked it into shape whilst damp.
Stand back and admire your amazing Sweet Magnolia Baby Blanket!
I hope you enjoy crocheting this pretty blanket. I love seeing your makes so tag me on Instagram @harrietsduck and use the hashtag #sweetmagnoliababyblanket
Happy crocheting!
Kate x